Access the mpx and WMS360 User Manuals by navigating to the required
section using the navigation located on the left site.
mpx User Manual
mpx is the web site used by the warehouse operators to perform the day to day operations of pick,
putting, counting and other workflows within a warehouse.
WMS360 User Manual
The WMS360 application is for warehouse managers for operataional visibility. It provides the tools and
the data to manage resource, inventory and locations to ensure the warehouse is running efficently as
possible.
Logging into mpx
This section covers the process to login to the mpx
software
Written by
Support
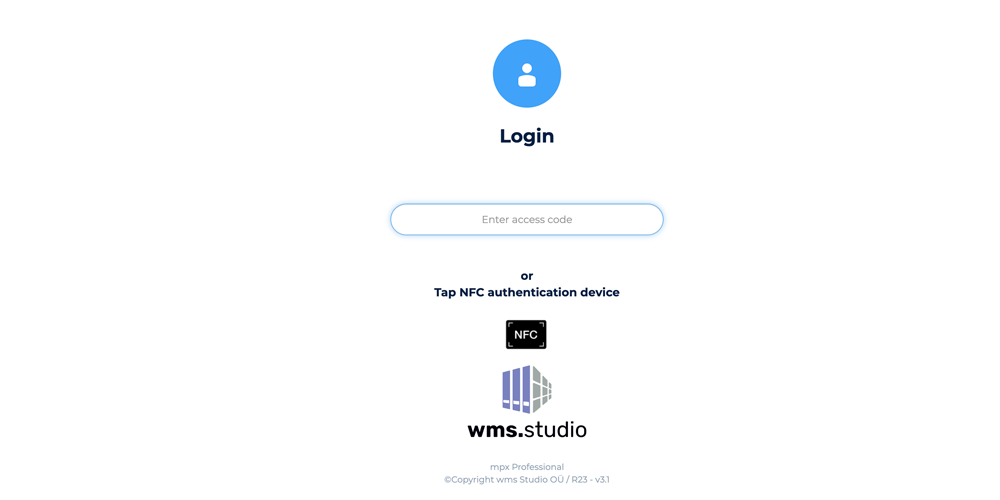
Login Page
mpx Login Page
There are two methods to login to the mpx software.
1 - Pin Code Entry
Enter your personal access code into the text box to gain access to the mpx software. If you don't yet
have
an access code see your site administrator who can create your access code.
2 - Smart Card or RFID/NFC reader.
For organisations that use ID cards for authentication, tap your corporate ID card against the RFID
reader. This option is only available if the site administrator has setup the RFID features during the
setup of the mpx Software.
If your personal access code is accepted, you will be taken to the home page. If the access code is
invalid, you
will be asked to re-enter your code.
Home page
This section describes the home page and the accessible features and
functions.
Written by
Support
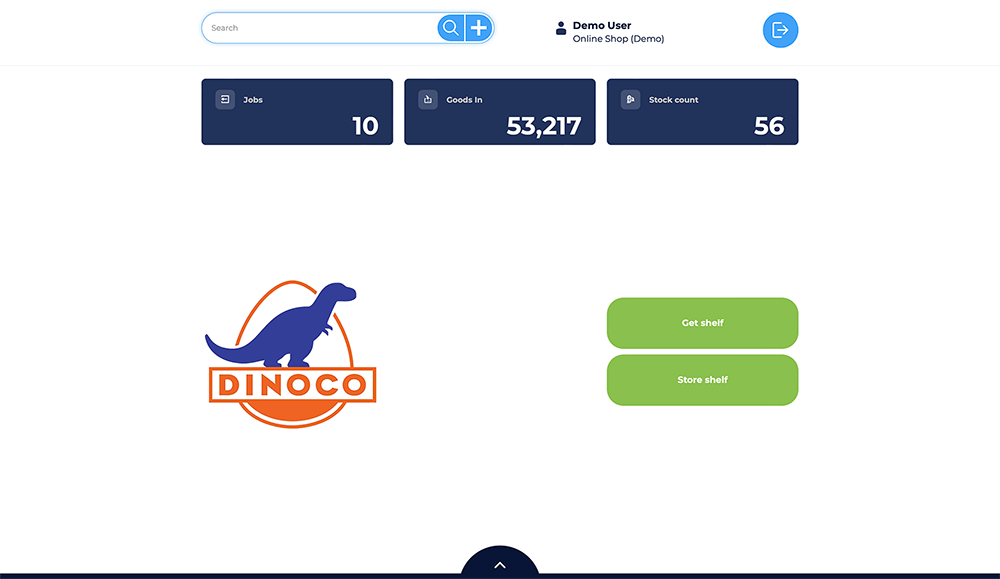
The logo can be set to be your corporate logo
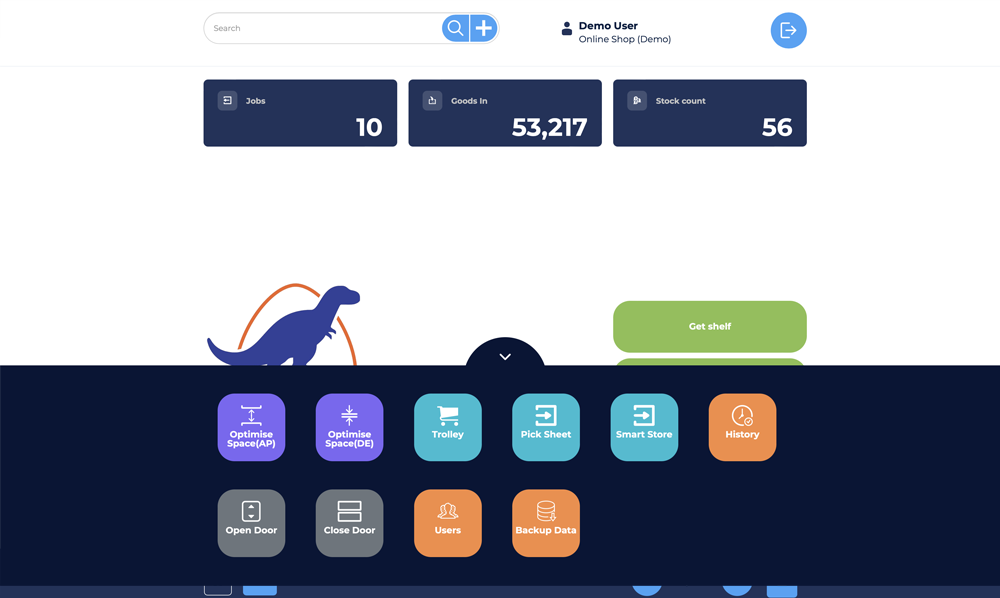
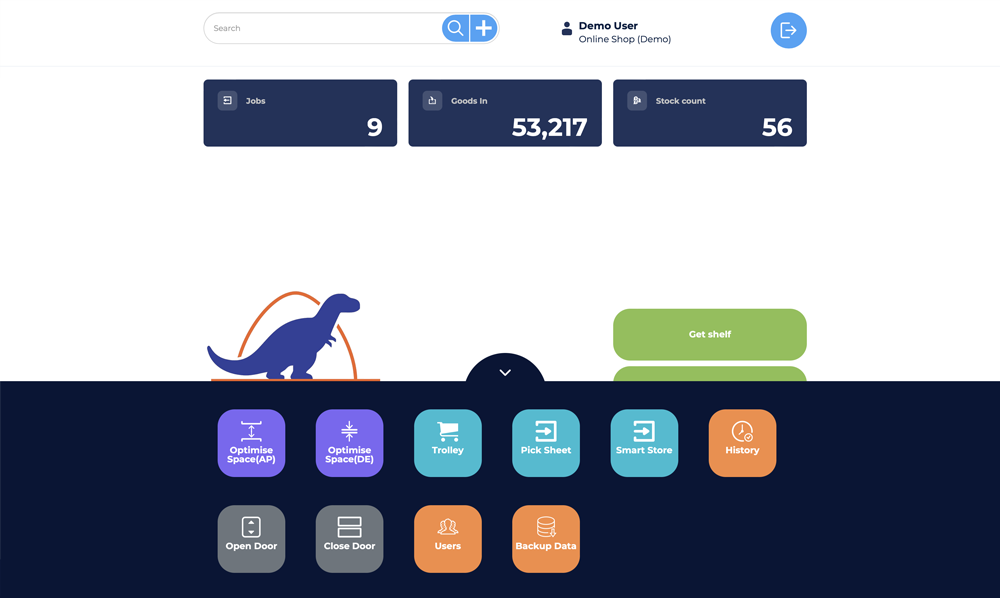
The home page is the starting point for many of the functions mpx provides. The screen layout shows
the most common actions performed and provides access to less frequent actions via the secondary slider
page.
Frequently used features.
The homepage of mpx offers customers simple access to a number of features and functions.
The search bar on the top of the homepage, helps you easily search for articles in
your inventory.
using the + button in the search bar allows for simple and easy creation of new articles.
The three main buttons, Jobs( or picks), Goods in and Stock Count give quick access to perform
operations
You can also use the "Get shelf or Store shelf" buttons to bring a shelf to the access point, or
return a shelf from the access point back into the lift.
Use the logout button to log out of mpx.
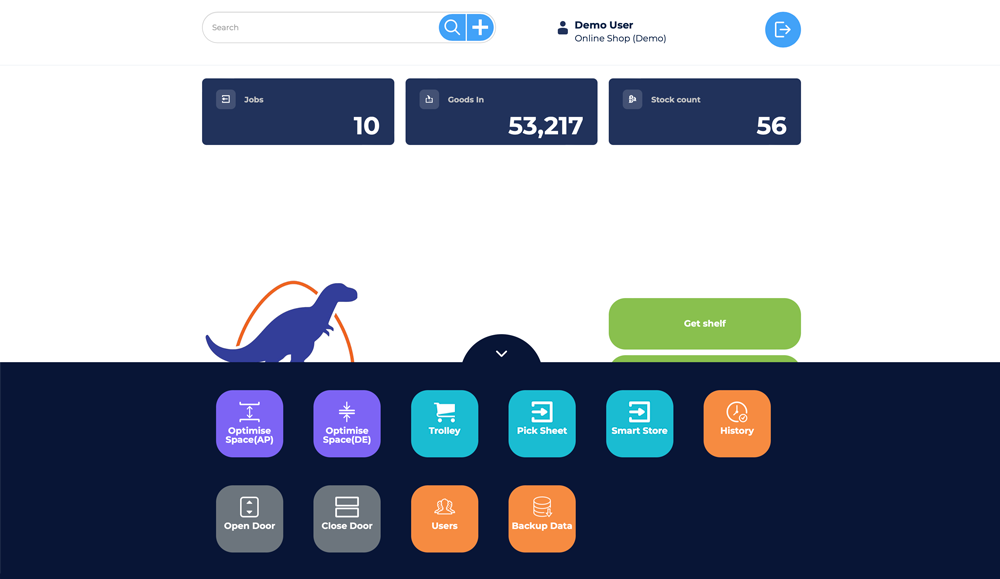
Less frequently used features.
At the bottom of the home page is our slider feature. By selecting the slider feature a number of
less used features are shown. The availability of features is based on the make and model of the
vertical
storage unit and the mpx license.
mpx Home Page Slider
Using the home page features.
Use the search box at the top of the page to search for articles. Simply type in a search term, or scan
the barcode of an article to activate the search. The search will look for articles that have an exact
match on the barcode or article name, or will look for the search term in the description of the
article.
For more information on searching go to the help section Performing a Search
To the right of the search box is a + icon. mpx can be configured to allow the user to create new
articles, and to create a new article simply press the + button. If you perform a search that finds no
matching article in the database, then you will be prompted if you would like to create a new article.
The ability to create a new article is an option that can be enabled or
disabled by the site administrator
The Jobs, Goodsin and stock count buttons, which are enabled or disabled based on the version of mpx
you have, shows the operator the workload that is due to be done. Jobs refer to pick lists, or pick jobs
that are in the system but not yet processed and the total number of jobs to be done is shown. Goods in
refers to the number of articles that are waiting to be received from a supplier and stored in the
warehouse, and the stock count value shows the number of articles which are required to be counted.
The features located on the home page slider are
Different manufacturers support different options so depending on the
manufacture, type of lift, and mpx license the home page slider features may be enabled or disabled.
Optimisation : Compact the shelves in a lift, either by bringing the most frequently used shelf
closer to the access point (AP) or packing the shelves as densely as possible(DE)
Open and close automatic doors
Induct a picking trolley to the lift
Manager users
Perform a SQL Backup
Access the Pick Sheet or Smart Store features
View the operational history of the machine
Perform a search
This section covers the mpx search function.
Written by
Support
The search bar at the top of the home page allows you to enter a search word to find matching
articles in mpx.
The search can be configured to look for a matching word, or partial word match (default is full word
match) as well a match on the barcode value and the article name. The word search is searching the title
(description) field.
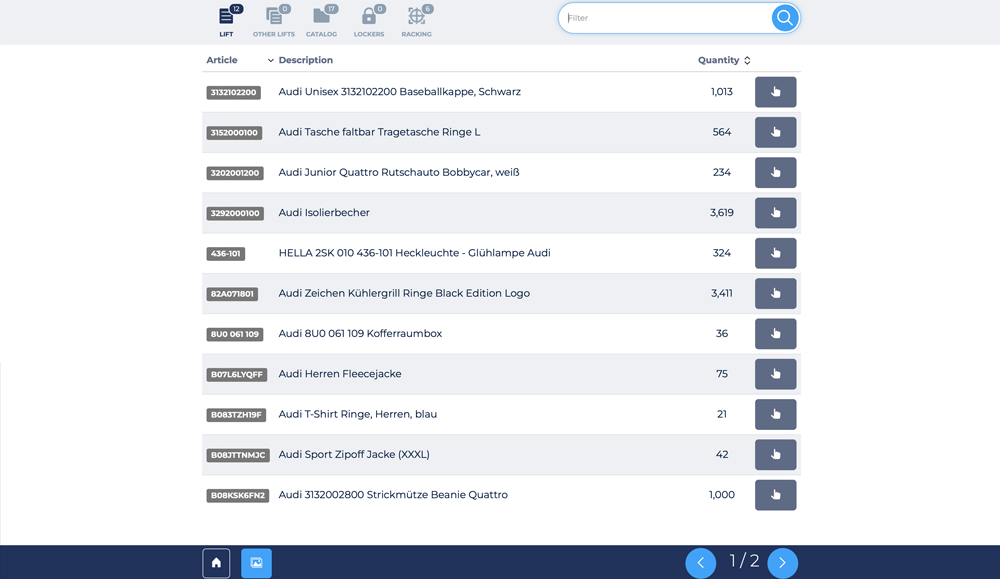
The search result page will be displayed if one or more articles are found. The results page shows the
matching information
Search Results header
Lift : This refers to the current lift and shows the number of articles that match the search term.
Other Lifts : This refers to lifts other than the current lift the operator is using and shows the
number of matching articles.
Catalog : This is the master list of articles.
Lockers : Shows the number of matching articles located in lockers
Racking : Shows the number of matching articles located in racking locations
The filter box allows you to filter the search results further.
By clicking on an icon in the search results header icon you will see a list of matching articles.
To select the required article simply click on the hand icon to be shown the locations where the
selected article is located.
Search Results
In the footer of the search results page you can perform the following
Click the home icon to return to the home page
Click the photo icon to see the photos of the items in the search results
scroll though the pages of search results using either the back (<) or forward (>) buttons
Search Result Footer
Picking an Article
This section covers how to pick an article from a location.
Written by
Support
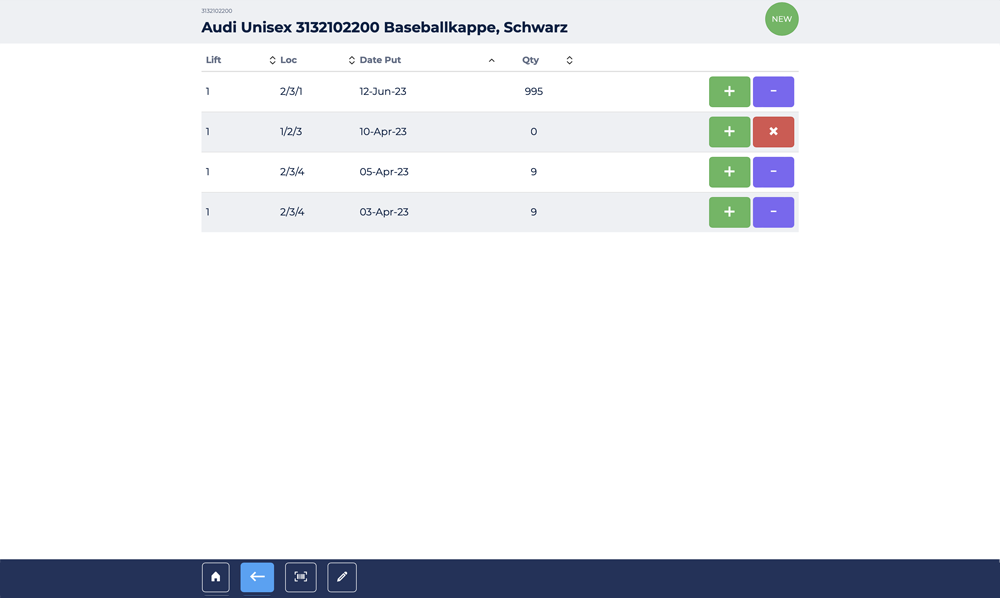
To pick an article out of a location, you must first perform a search, and select the article you wish
to pick.
You will then be shown a list of locations that contain the selected article with a - button. Simply
click
the - button against the location you wish to pick from.
Article Locations
When a location is empty, then pressing the red X button will delete
that location
If the location you have chosen to pick from is a vertical lift, then the required shelf will be
brought to the access point.
If the location is a locker, then the locker door will automatically be opened.
The pick screen will then be shown to the user.
Pick Screen
Simply enter in the quantity being picked and press Enter/Return key on the devices keyboard, or press
the next button in the footer to complete the pick.
The pick screen has a number of functions that can be performed.
At the top of the screen, are two print buttons. The first print button is to print a single label, and
the second print button allows you to enter a quantity of labels to print should you require more than
one. If the article is serialised (has serial number data) then the # button will also be shown.
The pick page footer contains the following functions
A home button to return to the home page
A camera button to activate the devices camera to take a photo of the article
A back arrow to go back to the list of locations for the article (prior page)
A barcode button, to enter the barcode data for the article.
Storing an Article (Put away)
This section covers how to store an article to a location.
Written by
Support
To put an article to a location, you must first perform a search, and select the article you wish
to put.
You will then be shown a list of locations that contain the selected article with a + button. Simply
click
the + button against the location you wish to put the article. You can also select the New button in the
top right of the page to create a new location to put the article.
Article Locations
When a location is empty, then pressing the red X button will delete that
location
If the location your have chosen to put to is a vertical lift, then the required shelf will be
brought to the access point. If the location is a locker, then the locker door will automatically be
opened.
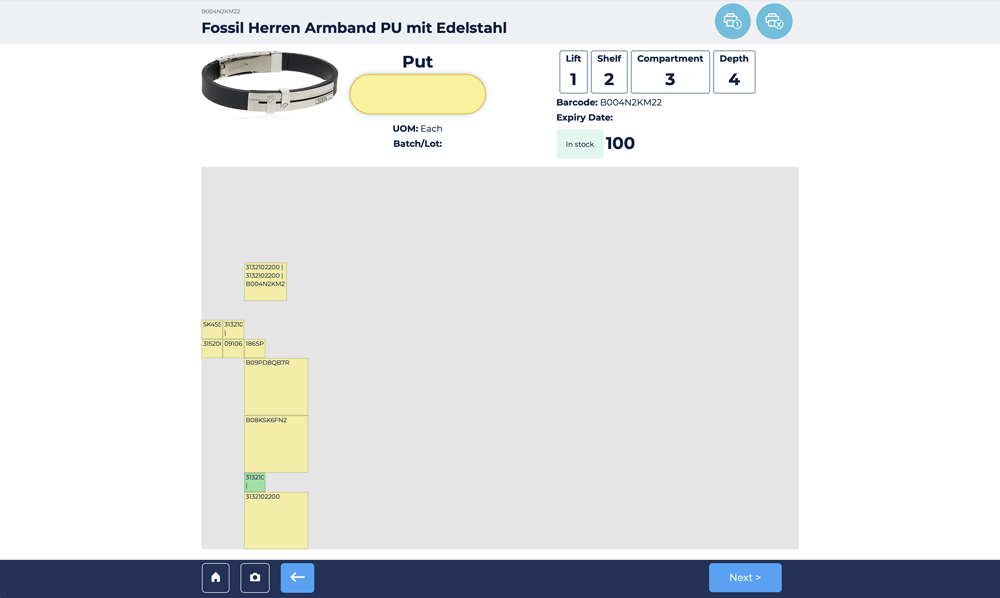
The put screen will then be shown to the user.
Put Screen
Simply enter the quantity being stored and press Enter/Return key on the devices keyboard, or press
the next button in the footer to complete the put.
The put screen has a number of functions that can be performed.
At the top of the screen, are two print buttons. The first print button is to print a single label, and
the second print button allows you to enter a quantity of labels to print should you require more than
one. If the article is serialised (has serial number data) then the # button will be shown.
The put page footer contains the following functions
A home button to return to the home page
A camera button to activate the devices camera to take a photo of the article
A back arrow to go back to the list of locations for the article (prior page)
A barcode button, to enter the barcode data for the article.
Create a new location
If you want to store the article at a new location, simply press the New button on the article location
page. You will then be prompted to select the type of location, you want to store the article
For a locker location, you will need to simply enter the locker bank number and then the locker number.
Press next to create a new locker location, the locker door will open and you can put the article into
the locker.
To create a new rack location, simply enter in the rack number, shelf number and compartment and depth
of the
location and press next. You can also scan a predefined barcode at the location to automatically enter
these details. You can also select the size of the bin being used to store the article.
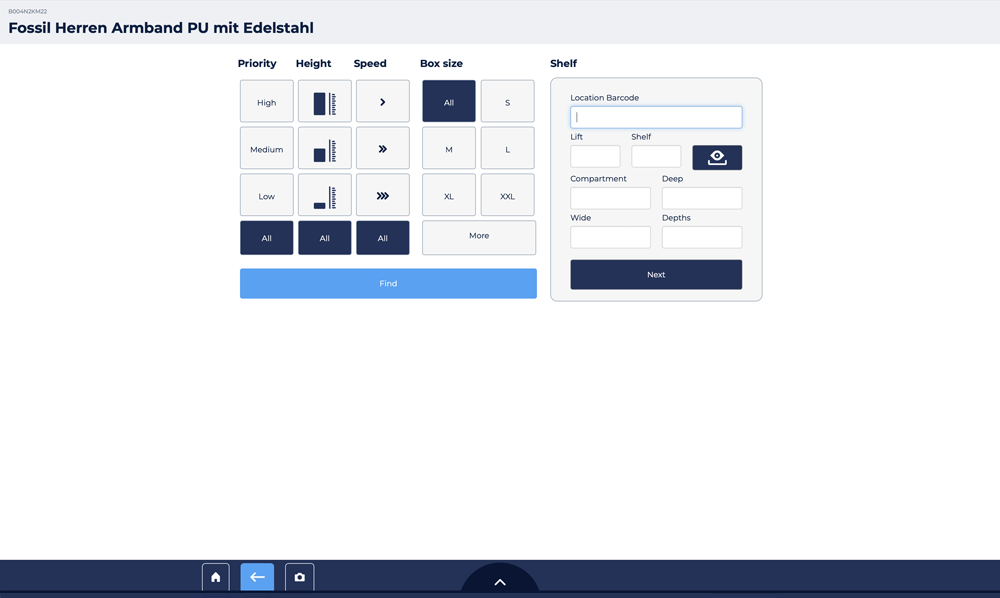
For a vertical lift location, enter the lift number, shelf number, compartment, depth, wide and depths
values of the location, select the box size and press the next button.
You can also use the search feature to find an existing location. Set the priority, shelf height and
speed, and the box size required and press the find button to locate an available existing location that
matches.
The new location page has a slider that will show more available box/bin sizes to use.
Creating and editing articles
This section covers how to create new articles and edit existing
article information
Written by
Support
The ability to create and edit articles is configured when mpx is installed. Typically this is disabled
as the host or ERP application is used to create and edit article data. Stand alone installations of mpx
with no integration often allow users with administrator level access the ability to create and edit
articles.
There are two ways to create a new article.
1 - Unable to find an article via searching
If you perform a search and the search finds no matching article, you will be prompted if you would
like to create a new article. This will activate the create new article popup, and populate the article
ID with the search term used.
2 - Click the + button the search bar
By clicking the + button the search bar you will active the create new article with no data.
Depending on your mpx configuration you will have the option to create your own article code, or have
mpx generate a new article code for you.
Create new Article popup
The options shown in the create new article popup are based on your system configuration. You may be
prompted to enter both an article ID and title, or just the title as the mpx system will assign an
article ID automatically.
Enter the required data into each field, and if you wish you can upload a photo of the photo. There are
three options to assign a photo to the article.
Click the camera icon to active the web cam attached to the device running mpx (Not available on
Hanel controllers)
Click the photo icon to upload a photo you already have
Click the link icon to enter a URL to a web based image.
You can also print a label for the item if needed.
Getting a shelf
This section covers the how to bring a shelf to the access point.
Written by
Support
On the home page there is a button 'Get Shelf' that when clicked will give you a number of options to
bring a specific shelf into the access point.
Get Shelf Options
Simply enter the lift number, (if you are controlling more than 1 lift) and the shelf number and press
the
enter key to bring the shelf to the access point.
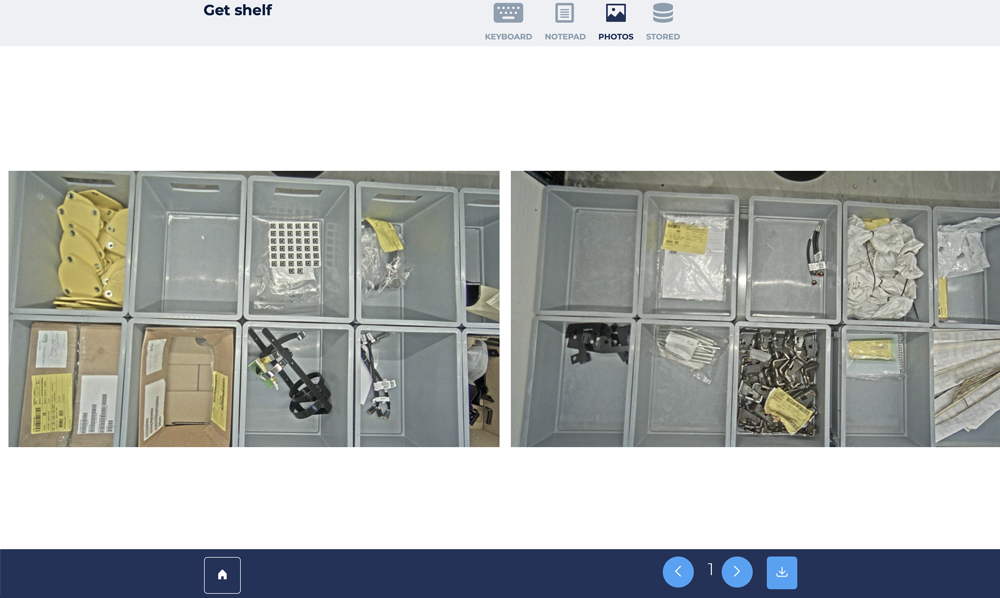
If cameras have been fitted above the access point opening you can browse through photos of each
shelf. You can then select the get shelf button in the footer to bring the shelf to the access point.
To move between shelves, simply click the < or > buttons in the page footer to move to the next
or
previous shelf.
Photos of shelfs
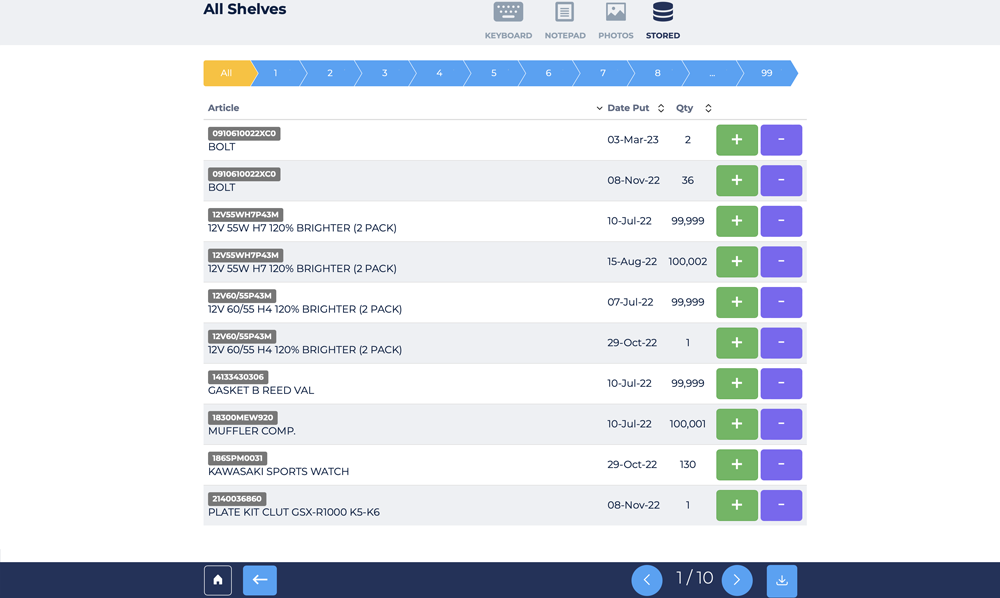
You can also get a list of all the articles stored in the lift by viewing the stored page
The store page allows you to quickly scroll through the list of all the articles stored in the lift.
You
simply click on the shelf number in the breadcrumb section to see the article on a specific shelf. If
there is more
than a page of articles on the selected shelf, use the < and> buttons to scroll to the next or
previous
page of articles for that shelf.
If you want a single list of all articles then select the ALL button in the breadcrumb.
You can now pick or put articles as required by clicking on the + or - button for each article
List of Stored Articles
Storing a shelf.
This section covers the process of storing (returning) a shelf.
Written by
Support
To store a shelf back into the lift, simply press the store shelf button on the home page.
This feature is only available on certain lift types.
Home page
Goodsin process
This section covers the process of receipting articles into mpx based
on
a purchase order or delivery created in an ERP application
Written by
Support
When articles are receipted into a warehouse they are typically purchased from a supplier via a
purchase
order. When the supplier is able to ship the articles to the warehouse they will supply to the warehouse
a delivery note that confirms which articles are being shipped to the warehouse.
Using either the original purchase order or the supplier's delivery note, mpx is able to receipt in and
put away the supplied articles and inform the ERP that the purchase order/delivery note has been
fulfilled so that payment to the supplier can be done.
mpx has a goods in section to process in coming articles either by purchase order, supplier or delivery
reference.
To access the goods in features click on the goods in button on the home page and the goods in page will
be shown.
Goodsin Home page
By clicking on the options in the header section you can view the data by supplier, purchase order or
delivery reference.
Viewing option for goods in data
Purchase Orders
To view a list of purchase orders select the orders button.
To view orders grouped by supplier name, click the supplier button.
To view delivery reference data, click the reference button.
Select a purchase order from the list, and you will see all the articles that are on the purchase
order.
You can then select an article on the purchase order to put-away and the put screen will be pre filled
with
the quantity that was ordered. After completing the put away of an article you will be returned to the
list
of articles on the purchase order and you can continue to put away the articles as needed.
The same applies to the supplier and delivery reference process. Simply select the article to put-away,
complete the put process and you are returned to the list of articles to put away and repeat the process
until all articles are put away.
Stock counting
This section covers the stock counting feature
Written by
Support
Stock counting is only available in host and pro versions of mpx.
To perform stock counting, the articles to count must have first been selected by the warehouse
administrator via the mpx WMS site.
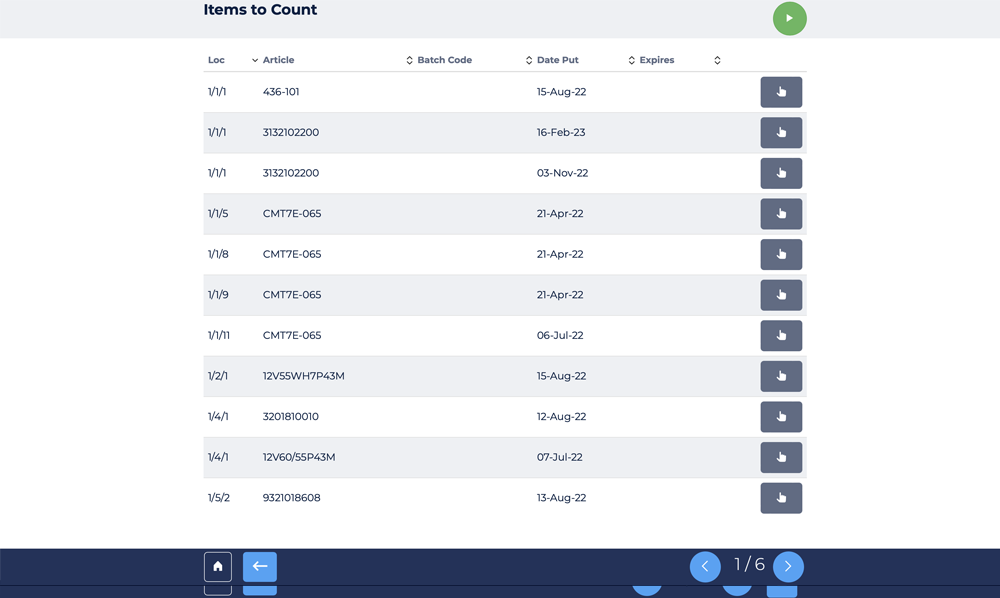
To count an article, simply press the stock count button on the home page and the articles to be
counted will
be shown.
Stock count page.
From the list of articles to count you can select a single article via the hand icon against an
article, or to
count all articles press the play button located at the top right of the page.
The play button will begin the process of performing a stock count on all articles on the list. As the
count is done for an article, then the next article count will begin automatically until all articles on
the list are counted.
Using Pick Sheets
This section covers the using the pick sheet feature
Written by
Support
The pick sheet feature is only available in the Lite version of mpx. It is
accessed from the home page
slider.
Pick Sheet is found on the home page slider
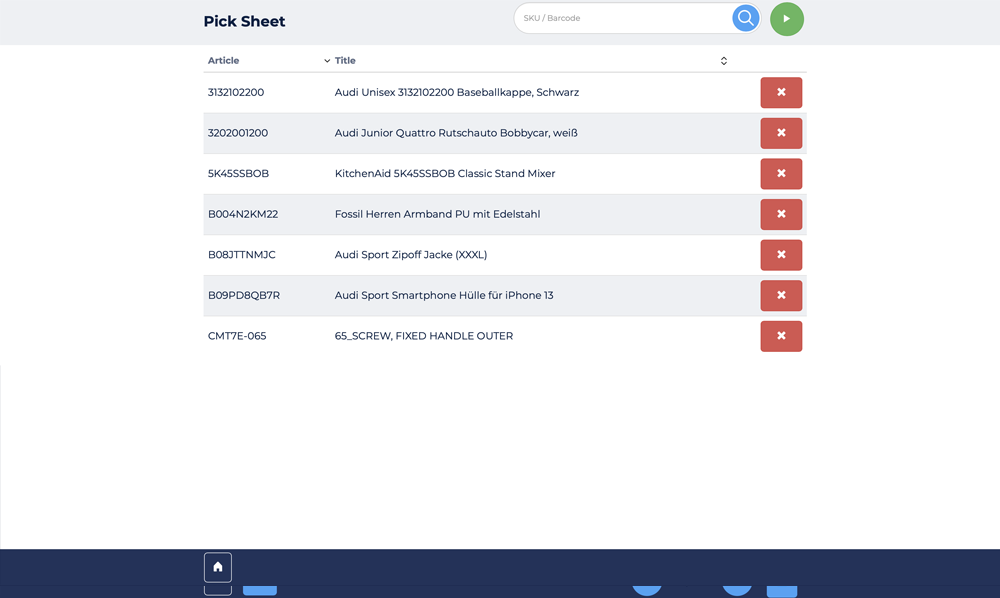
As the lite version does not have a job picking feature, we have introduced a new feature called a pick
sheet. The pick sheet is designed to allow a pick list to be created by the operator, so that when a
list of articles needs to be picked, the lift can bring articles to the access point in the most
optimised path.
The process is to simply scan or manually enter into the pick sheet all the article IDs required to be
picked. Once this pick sheet is complete, then the shelves will be brought to the operator in the most
efficient order and the operator will be presented with the picking information.
Pick Sheet Articles
Job picking
This section covers the process of job picking.
Written by
Support
Job Picking is only available in the host and pro versions of mpx. The
lite version has a pick sheet
feature instead.
mpx is able to receive a pick list from a host application that contains a list of articles required to
be
picked. The pick list is referred to as a pick job. The key difference between the host and pro version
is that the host version is able to pick one job at a time, which is suitable for low volume sites that
don't pick many jobs per day. The pro version has the ability to batch or consolidate a number of jobs
into a single pick list and is therefore more suited to sites that pick many jobs throughout a day.
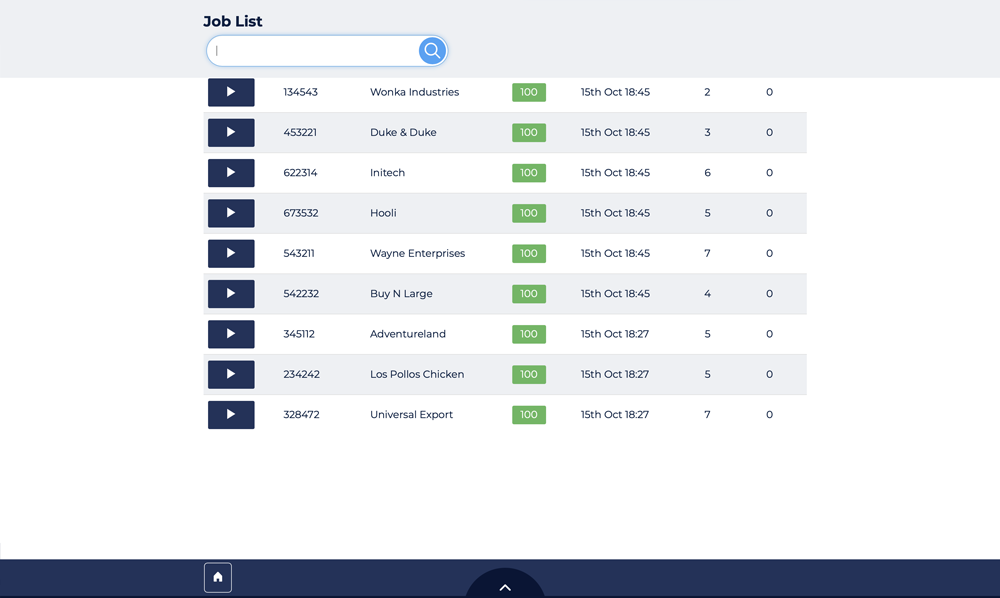
The home page will show the number of pending jobs to be done on the job button, and the operator can
click on the job button and will be shown a list of pending jobs.
The host and pro versions have slight variances in the way the jobs are presented.
A list of jobs shown in the host version
In the host version you can process a single job at a time. Simply select the pick job you wish to
process and press the play button against the job to start picking.
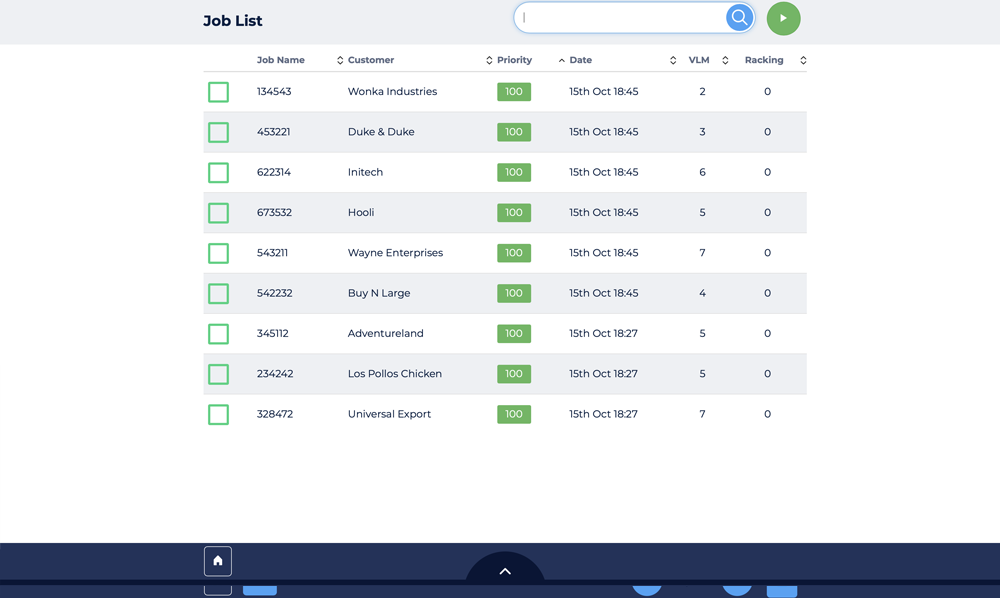
The pro version allows you to select a number of jobs, and then press the play button located to the
right of the search/filter box and the selected jobs will be consolidated into a single picklist.
A list of jobs shown in the Pro version
When the job is started, mpx will arrange the articles to be picked to be based on a shelf optimised
path. This means that the shelves will be brought to the operator in the most efficient order to reduce
the overall picking time, and reduce the number of shelf movements.
For each article required, the pick page will be shown with the quantity required already set in the
quantity box. The operator simply needs to press the enter key on the keyboard, or press the next button
at the bottom of the page to complete the pick and have the next article brought to the access point for
picking. This pick process will continue until all the articles on the pick list are picked and the job
is completed. The operator will then be taken back to the list of pending jobs so they can select
another job to process.
Pro Version
In the pro version the operator can select multiple jobs to process at the same time. What mpx will do
is to combine the orders to create one pick list that includes all the articles from all the selected
jobs. Where more than one job contains the same item, the operator will be prompted to pick the required
quantity of the article to fulfil all the selected jobs.
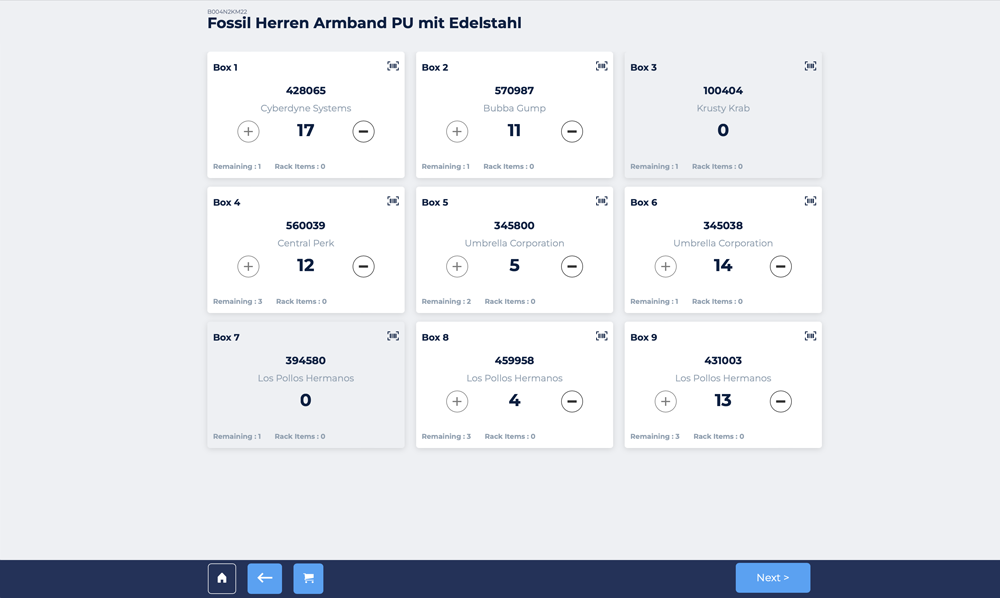
As the operator is picking the same item for multiple jobs, the operator needs to know how many of the
picked article is needed in each job in the batch. To do this mpx will show the sort screen after each
pick, so the operator can see the quantity of the picked article is needed in each job.
Sort Page
After picking the required quantity of an article to fulfil all the jobs selected, the operator is
shown the sort screen. This shows the quantity required of each article to be placed into each order.
The sort page shows how many each order requires
Optimising space in a lift
This section covers the lift optimisation options
Written by
Support
The optimisation feature only works with Hanel Lean Lifts. For other manufacturers the optimisation
process is done via the original controller where the lift supports this sort of operation.
There are two types of optimisation runs that can be done and they are both accessed from the home page
slider.
Access Point (AP) optimisation where the most frequently used shelves are positioned closest to the
access opening
Density (DE) optimisation where the shelves are simply compacted down removing any free space
between the shelves.
The two optimisation options are on the home page
slider
Closing and opening automated access doors
This section covers the feature to open or close doors
Written by
Support
This feature is limited to Hanel Rotomat lifts with automatic doors.
To open or close the automatic doors on a Hanel Rotomat, use the open or close buttons accessible on
the home page slider.
Using mobile trolleys
This section covers the feature of using mobile picking trolleys.
Written by
Support
This feature is available on the Pro version only
Where there are a number of lifts it is often required to pick items from more than one lift to fulfil
a customer order, or picking job. To do this mpx supports the use of mobile picking trolleys.
A mobile picking trolley is simple a movable trolley that contains a number of positions, or boxes
where each position or box represents an order.
When an operator selects a number of jobs to consolidate into a batch pick, mpx will allocate a job to
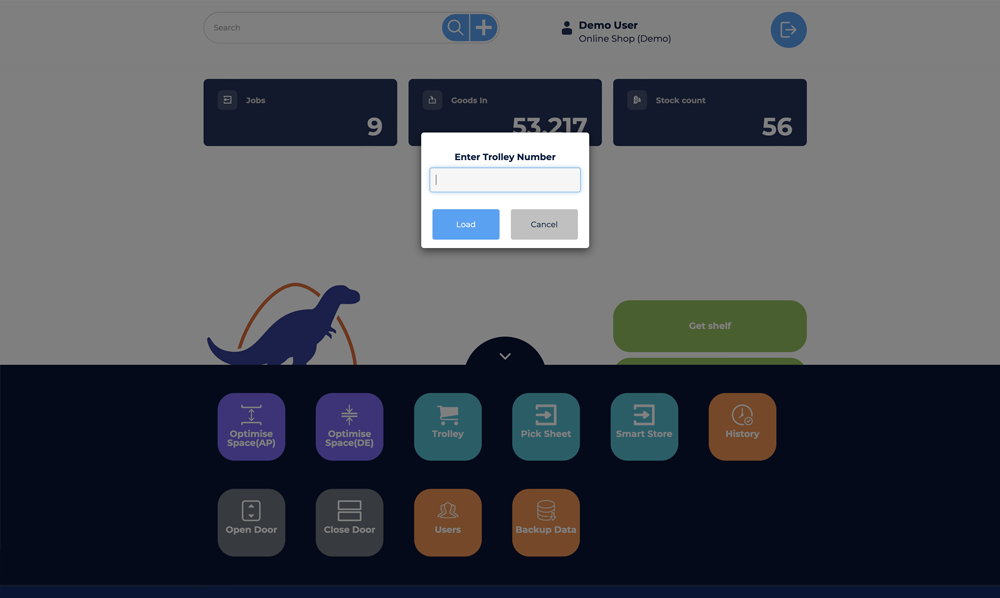
each position on the trolley. The operator can then simply scan the trolley number into mpx during the
processing of a batch job, and when the all the picks are completed on the first lift, the operator can
move the mobile trolley to another lift.
At the new lift, they can enter the trolley number and mpx will already know what jobs are allocated to
that trolley and continue the batch picking for the jobs on the trolley at the new lift.
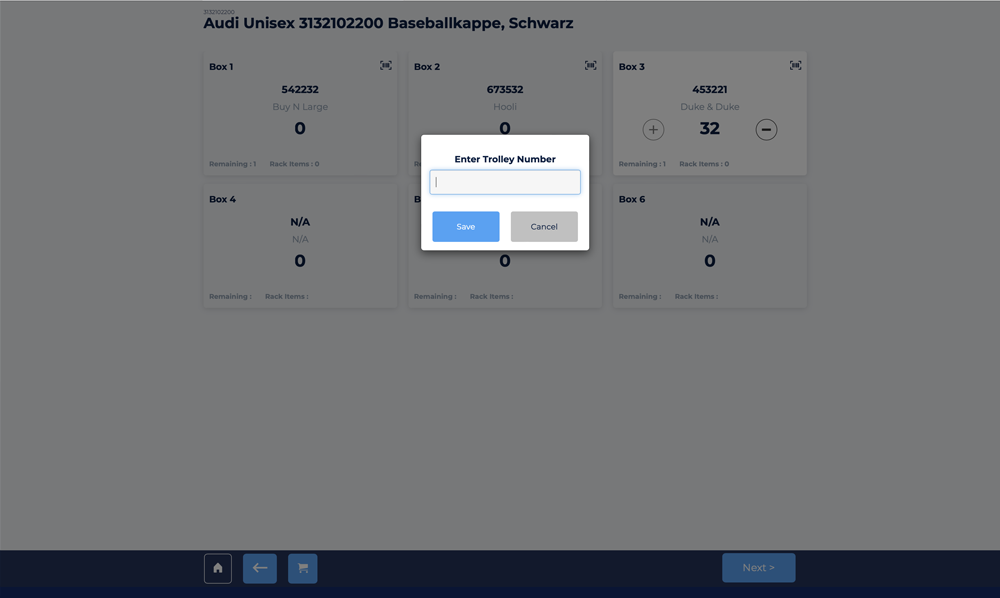
The steps are as follows
Start a batch job on the first lift
Once the job has started enter the trolley number via the trolley icon on the sort page
Complete all the picks from the first lift
Move to any other lift to continue picking for the jobs on the trolley
On the next lift continue the picking by entering the trolley number via the home page slider
trolley button
Repeat the process on all lifts until the jobs are completed
In the sort page footer, click the trolley icon to assign the
trolley number.On the next lift, induct the trolley via the trolley button on
the home page slider.
Using Smart Store to speed up putaways
This section covers the smart store feature which speeds up putting
away articles into the lift.
Written by
Support
Smart store allows the user to scan or enter the article codes of a number of items required to be
stored into the lift.
After the operator has created the put away list, simply press the play button and mpx will bring to
the access points the shelves in the most efficient order to ensure items are put away as quickly as
possible.
For new items that don't have a current location, the operator can create new locations as needed.
Operational History
This section covers how to look at the operational history of the
lift.
Written by
Support
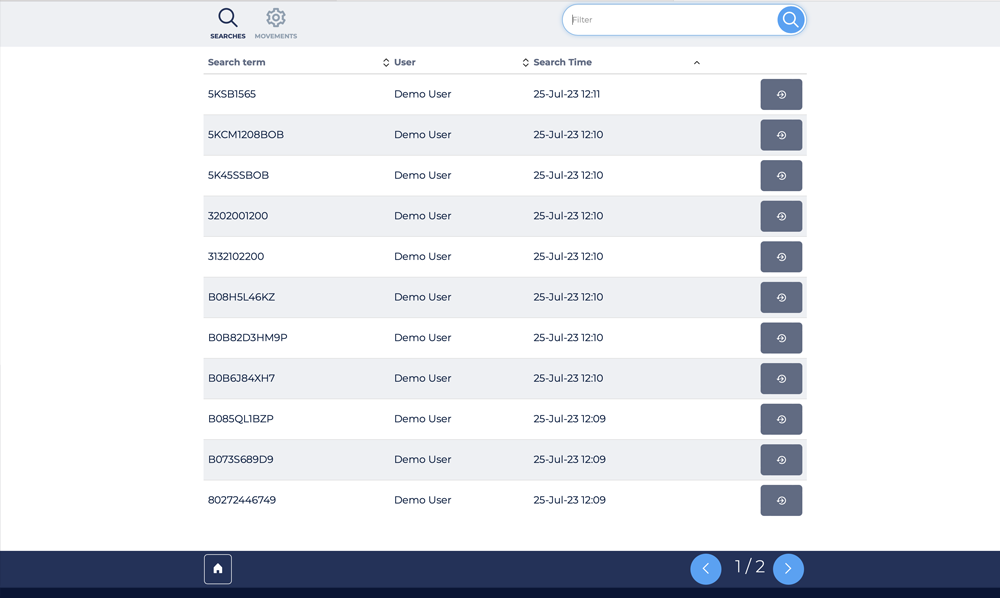
When an operator performs a search, or does an operation that results in the movement of a shelf such
as a pick or put, then mpx will keep a log of this.
Only the last 24 hours of history is available via the mpx web site. For more historical data use the
WMS site to view the entire history.
Search History
Manage Users
This section covers how to manage mpx users.
Written by
Support
mpx can be configured to not require a login. In this configuration all
actions are assigned to the user 'default'
To manage the mpx users click on the Users icon on the home page slider and the following page will be
shown.
mpx User list
To add a new user, simply click on the + button located to the right of the filter box. This will show
a popup where you can enter new user details.
To edit an existing user simply press the edit (pencil) button against the user's name, or to delete a
user click the delete button against the user record.
Backing up the SQL Database
This section covers how to do a backup of the SQL database via the mpx
web site.
Written by
Support
It is strongly recommended that the SQL Database is backed up using a proper, scheduled process. The
backup feature via the mpx Web site is not considered a process to be relied on as it requires the
operator to manually do the backup.
The backup process must be configured by the site administrator for this feature to work. Once the
backup feature is configured then the operator needs to only press the Backup button on the home page
slider and backup of the SQL database will be done.
WMS360 Overview
This section describes how to navigation the WMS360 application, it
primary features and the common functions to give you a good overview of how to use the WMS360 web site.
Written by
Support
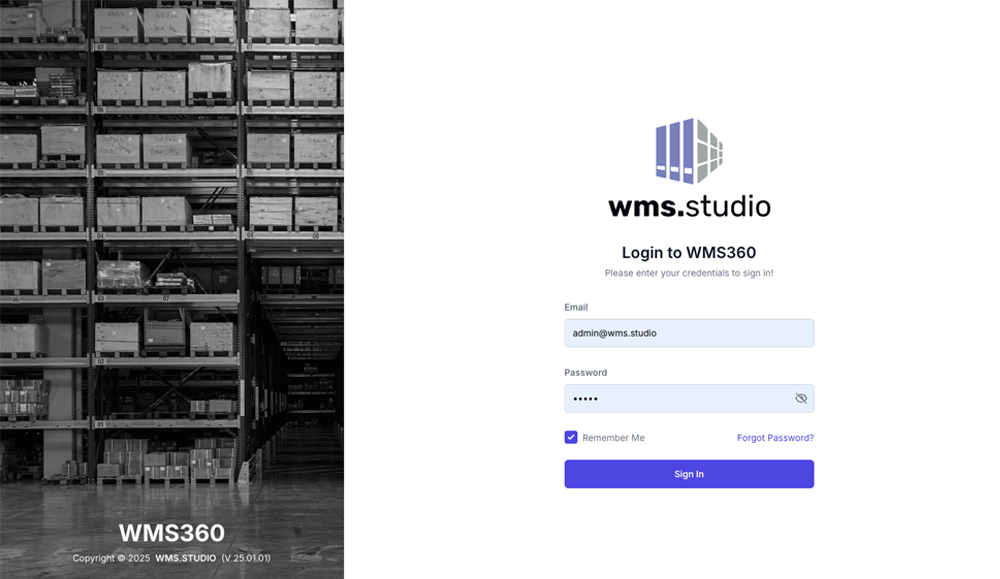
WMS360 Login page
The range of features and functions is based on the license your organisation has purchased. This
overview covers the features available on the WMS360 Lite License.
To access the WMS360 application you will need to contact your site admistrator to create a login.
Filtering Warehouses and setting language.
Click on the flag icon to change the language, or click the warehouse icon to set the filter options to limit the warehouse data the WMS application will show.
Exporting & Searching data.
Each page contains an export button that will export the page data. You can customise the data fields export per page to increase the metadata exported.
Each page also has a search box, where you can enter in a search term and search for matching data with in the data result. Where a page contains data based on a date range a date filter option will also be available.
Multi Use Bins.
Multi use bins are bins that are able to contain a number of different articles. Typically in a warehouse each bin should be allocated to store a single article, however its also common to store a range of different article in a single bin. To enable this feature, when editing a shelf map select a bin, view its article allocation, and set the MultiBin option to be on.
WMS360 Quick Start
This section covers the minimal steps required to setup mpx via the
WMS360 application. The process is done via a series of steps that need to be completed in a specific
order.
Written by
Support
The inital step is to do the setup of bins, also known as the storage boxes or tote boxes. These are
the physcial bins used to store products and you will need to know the size (mm) of each bin.
The second step is to setup your vertical lifts and racking storage dimensions. This is done via adding
new lifts or racks. You can also add new bulk, cross dock, inspection and quantine racking. For more
advanced operation you can also setup the Pick-to-Light racking and the automated H Racks
The third step is to design your shelf map templates. These are the maps of each shelf and how the
bins(from step 1) and placed on the shelfs.
With the shelf maps you have created you know assign those maps to specfic shelves.
With the shelves now mapped out you can start to assign articles to each bin on each shelf.
Step 1 - Bin Setup
A bin is a physcial box that will contain an article, and is also often referred to as a tote box or
storage box. Each bin has a width, depth and height that will be entred in millimeter sizing.
Expand the Resources menu option in the left hand navigation section
Select the Bins menu option to show the list of bins already configured.
Click the Add Bin button in the top right
You can now enter the bin details. Give the bin a name, and select the type of bin and then enter
the bin dimensions
You can automaticlly create a rotated version of the bin, by ticking the clone as rotated bin option
Click the Save button to create the bin.
WMS360 Add Storage Bin
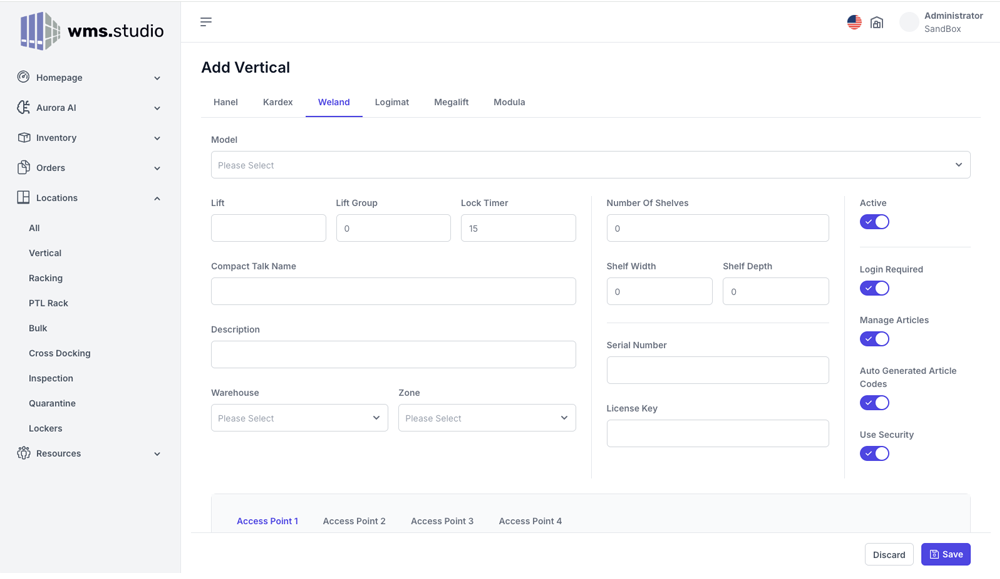
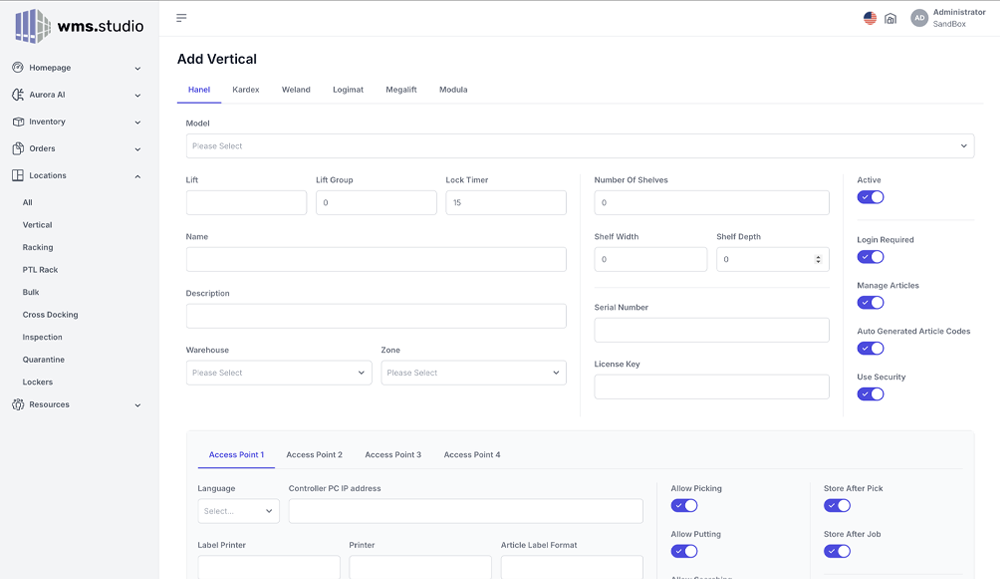
Step 2 - Creating a vertical lift or rack.
If you have a vertical storage machine you can now add each machine to your warehouse.
Expand the Locations menu option in the left hand navigation section
Select the vertical menu option to show the list of vertical lifts already configured.
Click the Add Vertical button in the top right
Select the manufacture of the Vertical lift you wish to add to your warehouse.
If the manufacture has different models then select from the drop down the type of vertical lift
required
Complete the rest of the details as required and click save to create the vertical lift
WMS360 Add Vertical Lift
Step 3 - Creating Shelf Maps.
A shelf map is a visual diagram of the bin layouts on a shelf. You can create layout templates and
assign them to one or more shelfs in a verttical lift
Expand the Locations menu option in the left hand navigation section
Select the vertical menu option to show the list of vertical lifts already configured.
Click the Add Vertical button in the top right
Select the manufacture of the Vertical lift you wish to add to your warehouse.
If the manufacture has different models then select from the drop down the type of vertical lift
required
Complete the rest of the details as required and click save to create the vertical lift
WMS360 Add Vertical Lift
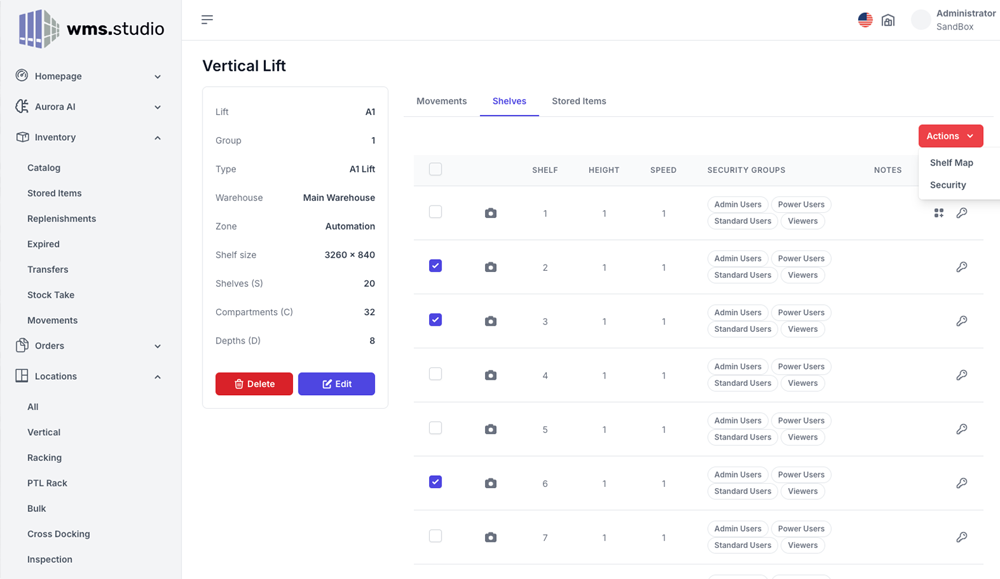
Step 4 - Assigning Shelf Maps and Articles to Bins.
Now that you have your shelf map templates designed, its time to assign the template to the shelves in
your vertical lift or racks
Expand the Locations menu option in the left hand navigation section
Select the vertical menu option to show the list of vertical lifts already configured.
Select the lift by clicking on the Lift Name to access the lift settings and configuration
View the page 'Shelves' and place a tick in the checkbox of each shelf you wish to assign a shelf
map
From the Actions button menu select Shelf Map option
Select the shelf map to assign to the selected shelves and click the Save button.
The shelf map template is now assigned to the selected shelves and the map icon will now appear against
each shelf.
WMS360 Assign Shelf Map to Shelves
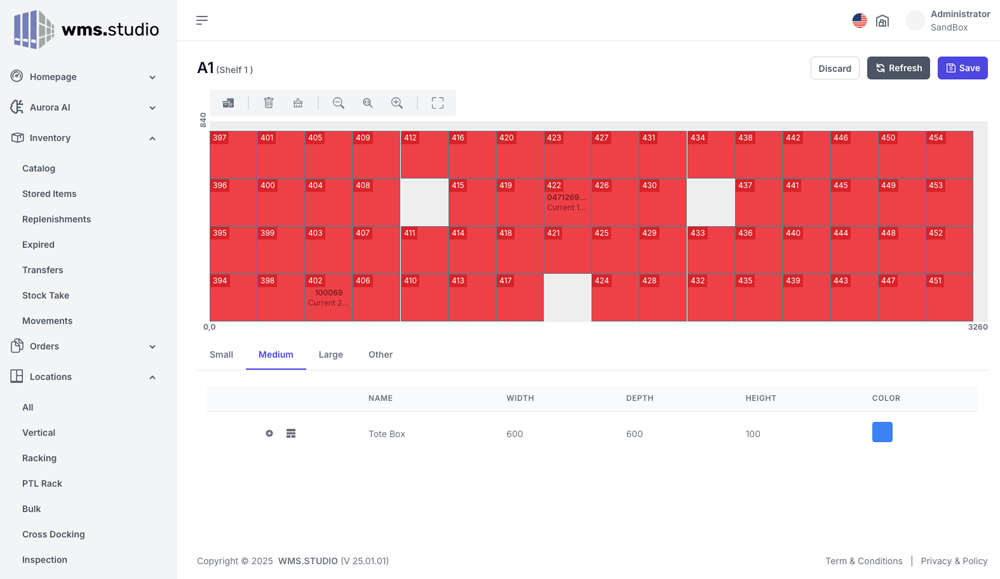
You can now select a specific shelfs shelf map to assign articles to bins, or configure the bin as a
multi use bin
Click on the shelf map icon for the shelf you wish to edit and the following page will be displayed
The following graphic is an example of a shelf map and will be different to
the shelf map you have designed.
WMS360 an example Shelf Map
Inventory
The inventory section provides a real time view over the articles in
the warehouse.
Written by
Support
Inventory navigation
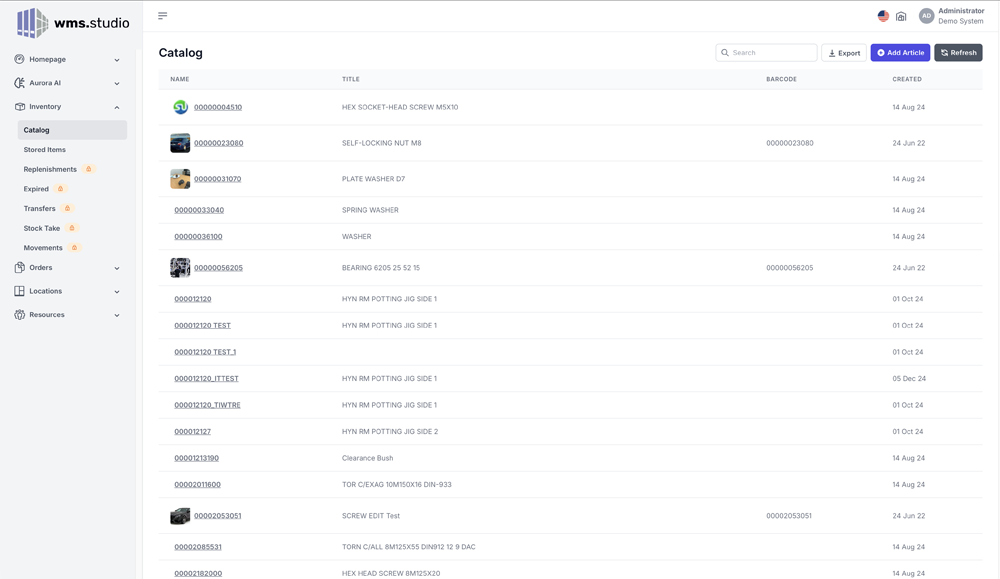
The Catalog view lists all the articles registered in the database. This is typically referred to as
a master catalog.
The Stored view lists all the articles currently allocated a location in the warehouse.
The Replenishment view show a list of all the articles that need to be replenished. This is
calculate on the current on hand quantity being less than the minimum quantity allowed for an article.
The Transfer view shows all the article that are pending either the pick or put side of a transfer
opertion.
The Stock take section is where you can setup stock count processes and view the result of prior
stock takes.
The Movement section shows a list of all article movements and allows the user to filter movement
data based on date range or user.
Article View
In each of the inventory sections you can select an article and view further and more details
information.
The artilce page consists of a summary section and then a numboer of pages providing more detailed
information
Inventory Detail Pages
Click on each section to view the detailed information
The locations page displays the current locations of the selected article
The movements page displays all the movement history of the selected article
Receiving show the current outstanding purchase orders for the items
Counts page shows the history of each time the artice has been counted within the stock take
process
The bins page allows the article to be linked to specific bin type for storage. This information
allows the mpx user to quickly find approirate bins quickly to store the article
The settings page allow some additional setting such as the stock count category, the stock
valuation group to assit with stock counting. Here you can also see a list of related, or frequently
pick article with the selected Article.
Deleting an Article.
An article can be deleted from the catalog if a number of conditions are meet. The article can not
have a location, or any movement history. If these conditions are meet, then a delete button will be
visible.
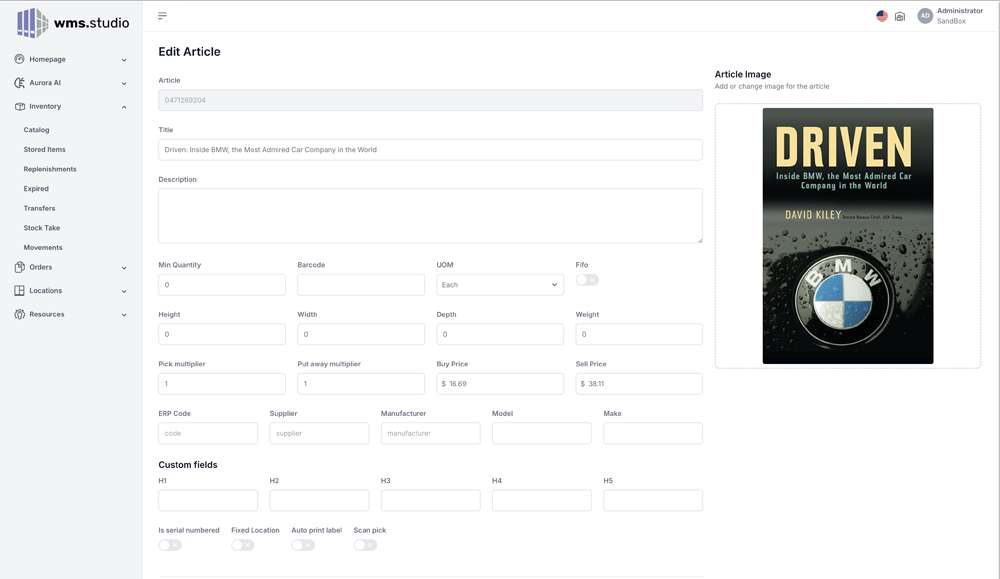
Editing the Article information.
To edit an article click on the edit button to open the edit page.
WMS360 Edit Article
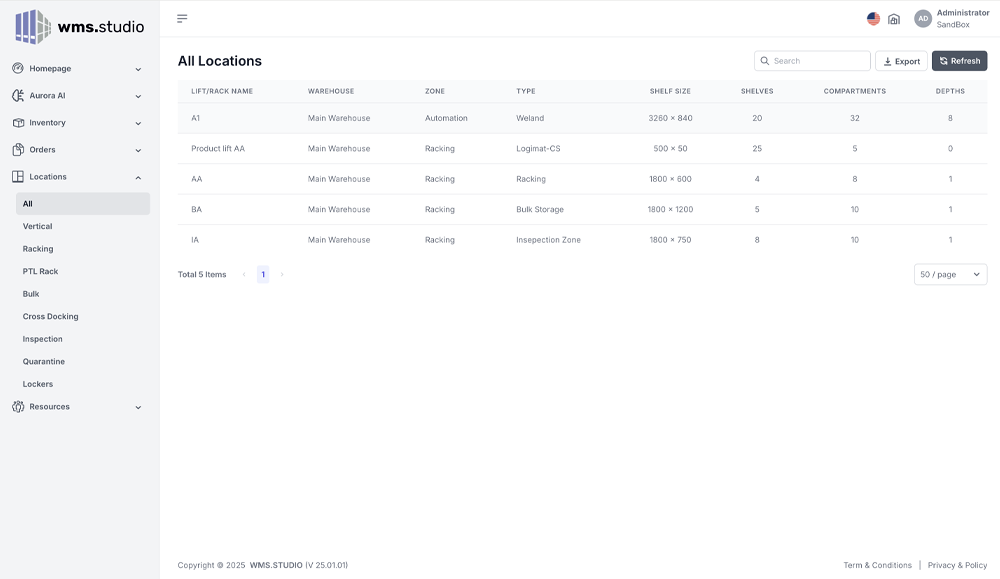
Locations
This section is where vertical storage lift, and rack based locations
are managed. You can create new vertical lifts and rack based locations such as bulk zone as well as Pick
to light racks and H racks.
Written by
Support
The logo can be set to be your corporate logo
WMS360 and mpx support a number of diffent location types. For each location type you will find a
navigation section to assist you in manage the different locations. Some locations are whats referred to
as a pick face meaning that items can be picked from that location type, and other are not such as a
bulk location which are non pick face. When a pick list is processed the items are only made avaialbe to
pick from a pick face location.
Location Types.
Use the navigation section to access the different locations types.
All - This will list all dirrent location vertical lifts and rack based locations.
Vertical - A list of the the different vertical storage lifts will be displayed and you can add new
lifts.
Racking - A list of all the traditional storage racks in the warehouse will be displayed and you can
add new racks
PTL Rack - A list of all our smart pick-to-light racks are shown and you can add new PTL racks.
Bulk - A lift of all the bulk storage racks is show and new bulk storage racks can be added.
Cross Docking - A cross docking zone is a zone where inbound articles are quickly sorted and
transferred directly to outbound orders so that the articles don't need to be put away and then
picked, a they are simply transfer from inbound to outbound orders. This section shows all the cross
docking racking and you can create new cross docking racks.
Inspection - This is a rack location that is used to store inbound goods that will need to be
inspected before being allowed to be stored in the warehouse. You can add new inspection zones.
Quantine - A Quantine rack is a rack where items can be stored that are removed from the warehouse.
You can add new quantine zones.
Lockers - A list of our smart storage lockers that provide secure storage. New locker banks can be
created here.
Vertical, Racking, PTL Racks and lockers are the pick face locations.
Vertical
The current vertical locations are displayed showing the information of each lift. To add a new lift,
click the +vertical button.
Add a new Vertical Lift.
mpx and wms.Studio 360 support a number of different manufactures vertical lifts, ranging from older
generation lifts such as the Logimat CS/CS, Kardex C2000 and Megalift machines, all the way through to
the latest generation lifts from Hanel (MP14), kardex C3000 and Weland Lifts.
To setup a new lift first select the manufacturer page, and then select the type of lift from the drop
down (if the manufacture has different models)
Contact wms.Studio for support of lifts not available via the standard
setup process.
mpx Home Page Slider
It is recommendend that the WMS Studio partner setup the lifts when the
lifts are installed.
Complete the information page and then save the vertical lift informataion, and a new lift will be
created.
For specific features on certian models, you will need to contact wms.Studio for support in enabling
these features if supported.
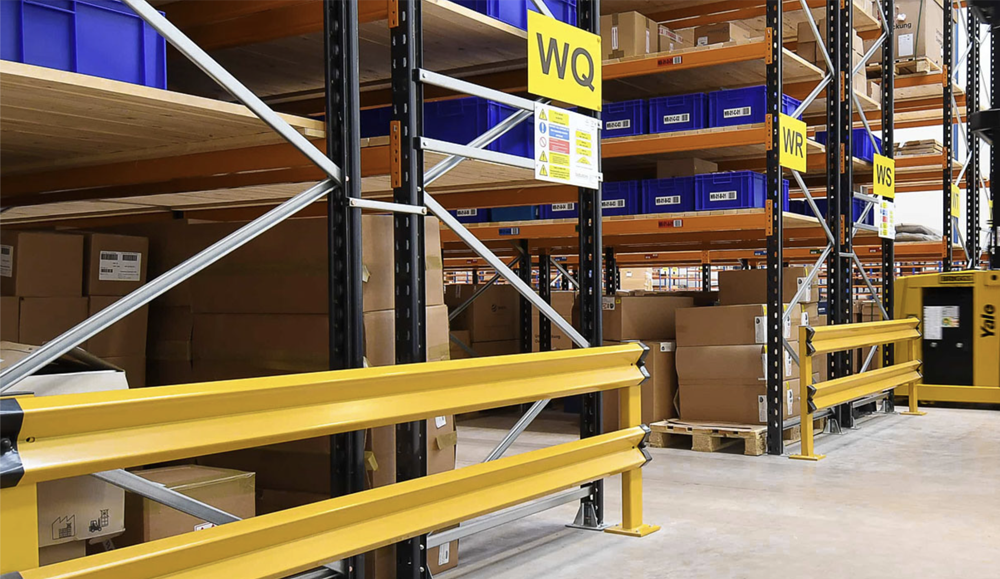
Add a new rack.
Racks are what most typical warehouses will use for storing products. Racks can vary from industrial
shelving capable of holding tons of product per shelf, or a simple low cost shelf or even a table. As
long as an area of the rack can be defined with a unique location, using the format of a unique rack
number, compartment and shelf number.
Racks are typically referred to by a rack number, but often its a combination of letters such as AA or
BA. Each number, or letter combination must refer to a single rack, however the rack can have a number
of compartments (left to right sections) and shelves within each compartment.
A typical rack in a warehouse.
Simply enter the rack number and name (AA or other letters if preferred), the number of compartments,
and the number of shelves.
If you are configuring a single rack, where different compartments will have a different number of
shelves, you will need to hide the shelves not in each compartment
Click save to create the new rack location.
Users
This section covers how to create new users in wms360 and mpx.
Written by
Support
The view of users in mpx and WMS360.
Setting up users in mpx and wms is based on the licensing version you have purchased.
Lite License
The lite license is limited to logins, and associating a login with a role such as the Admin role, or a
Picker role. User groups are not supported in the Lite license.
To create users when you have the Lite License, use the mpx software to create, edit and delete users.
Pro License.
The pro license allows you to create logins as well as user groups and then define access based on the
user groups. You can create as many user groups as required and define down to a shelf which users
groups have what sort of access
To create a new user (pro mode) cick the Add User button
Enter the username, email address, password and if required the Smart Card Code. You can then select
the role and the user groups to assign the user to.
User Groups
This section covers the creation of user groups and assigning users to
groups.
Written by
Support
User groups all users to be placed into one or more groups, and then security permissions to be
assigned by groups making it easier to manage security for larger sites..
The logo can be set to be your corporate logo
To access the security group features, navigate to the Security sectionin the Resources navigation
section.
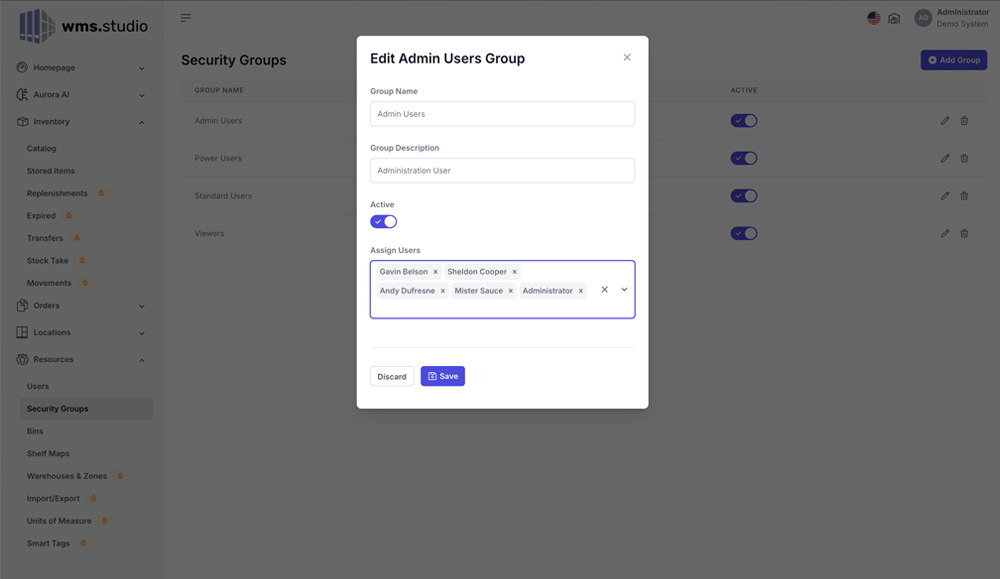
Add new Group.
To add a new security group simply press the Add Group button.
Enter the name of the new group and its description. You can then assign the users to the group
In the Location Section, you can then assign the user group to each shelf by selecting the require
shelf and under the action menu select Security to assign the user group the to shelf.